.png?width=189&height=505&name=Vector%20(2).png)
.png?width=265&height=582&name=Vector%20(3).png)


.png?width=286&height=582&name=Vector%20(7).png)

 Copy link
Good news, we wanted to let you know that your SureCloud application is getting an upgrade! On March 25th we’ll be rolling out a powerful, new tile-based user interface. This is the result of extensive customer feedback and testing.
Discover…
1. Announcement
2. What’s Improved?
3. Orientation
Announcement
The new layout and interface provides a simple way of navigating around your SureCloud application(s):

What’s improved?
- Tile-based interface means that getting to your favourite register, form or questionnaire is a single mouse click away.
- Easily search and create favourites for your commonly visited locations in your application(s).
- Updated SureCloud dashboards now look clean and modern while retaining all the same powerful features.
What happens next?
On March 25th, 2019 the new interface will become the default when you login. However, you will be able to revert to the classic view if you wish.
From April 29th, 2019 access to the classic interface will be removed, only the new interface will be available.
Is any action required?
No. However, we recommend you take some time to familiarise yourself with the new interface.
What’s Improved?
The new SureCloud Tiles interface brings improvements in the following areas:
- A new tile-based user interface to navigate around your application.
- Click on a tile to access any part of your application.
- New navigation bar (Nav Bar) to gain access to your tiles
- Favourite your commonly used tiles.
- Easily find recently visited tiles.
- New look and feel dashboard; modern and clean with a new colour palette.
- New heat map dashboard portlet.
- New free text dashboard portlet (add titles and commentary to any dashboard).
- Easily search for any tile.
- Dashboards now automatically refresh themselves every hour.
See the new interface in action here
Orientation
Introduction
The SureCloud Tiles User Interface (UI) is based around two key concepts; Tiles (for navigating to places within the SureCloud platform and a new Nav Bar (to give you quick and easy access to Tiles).
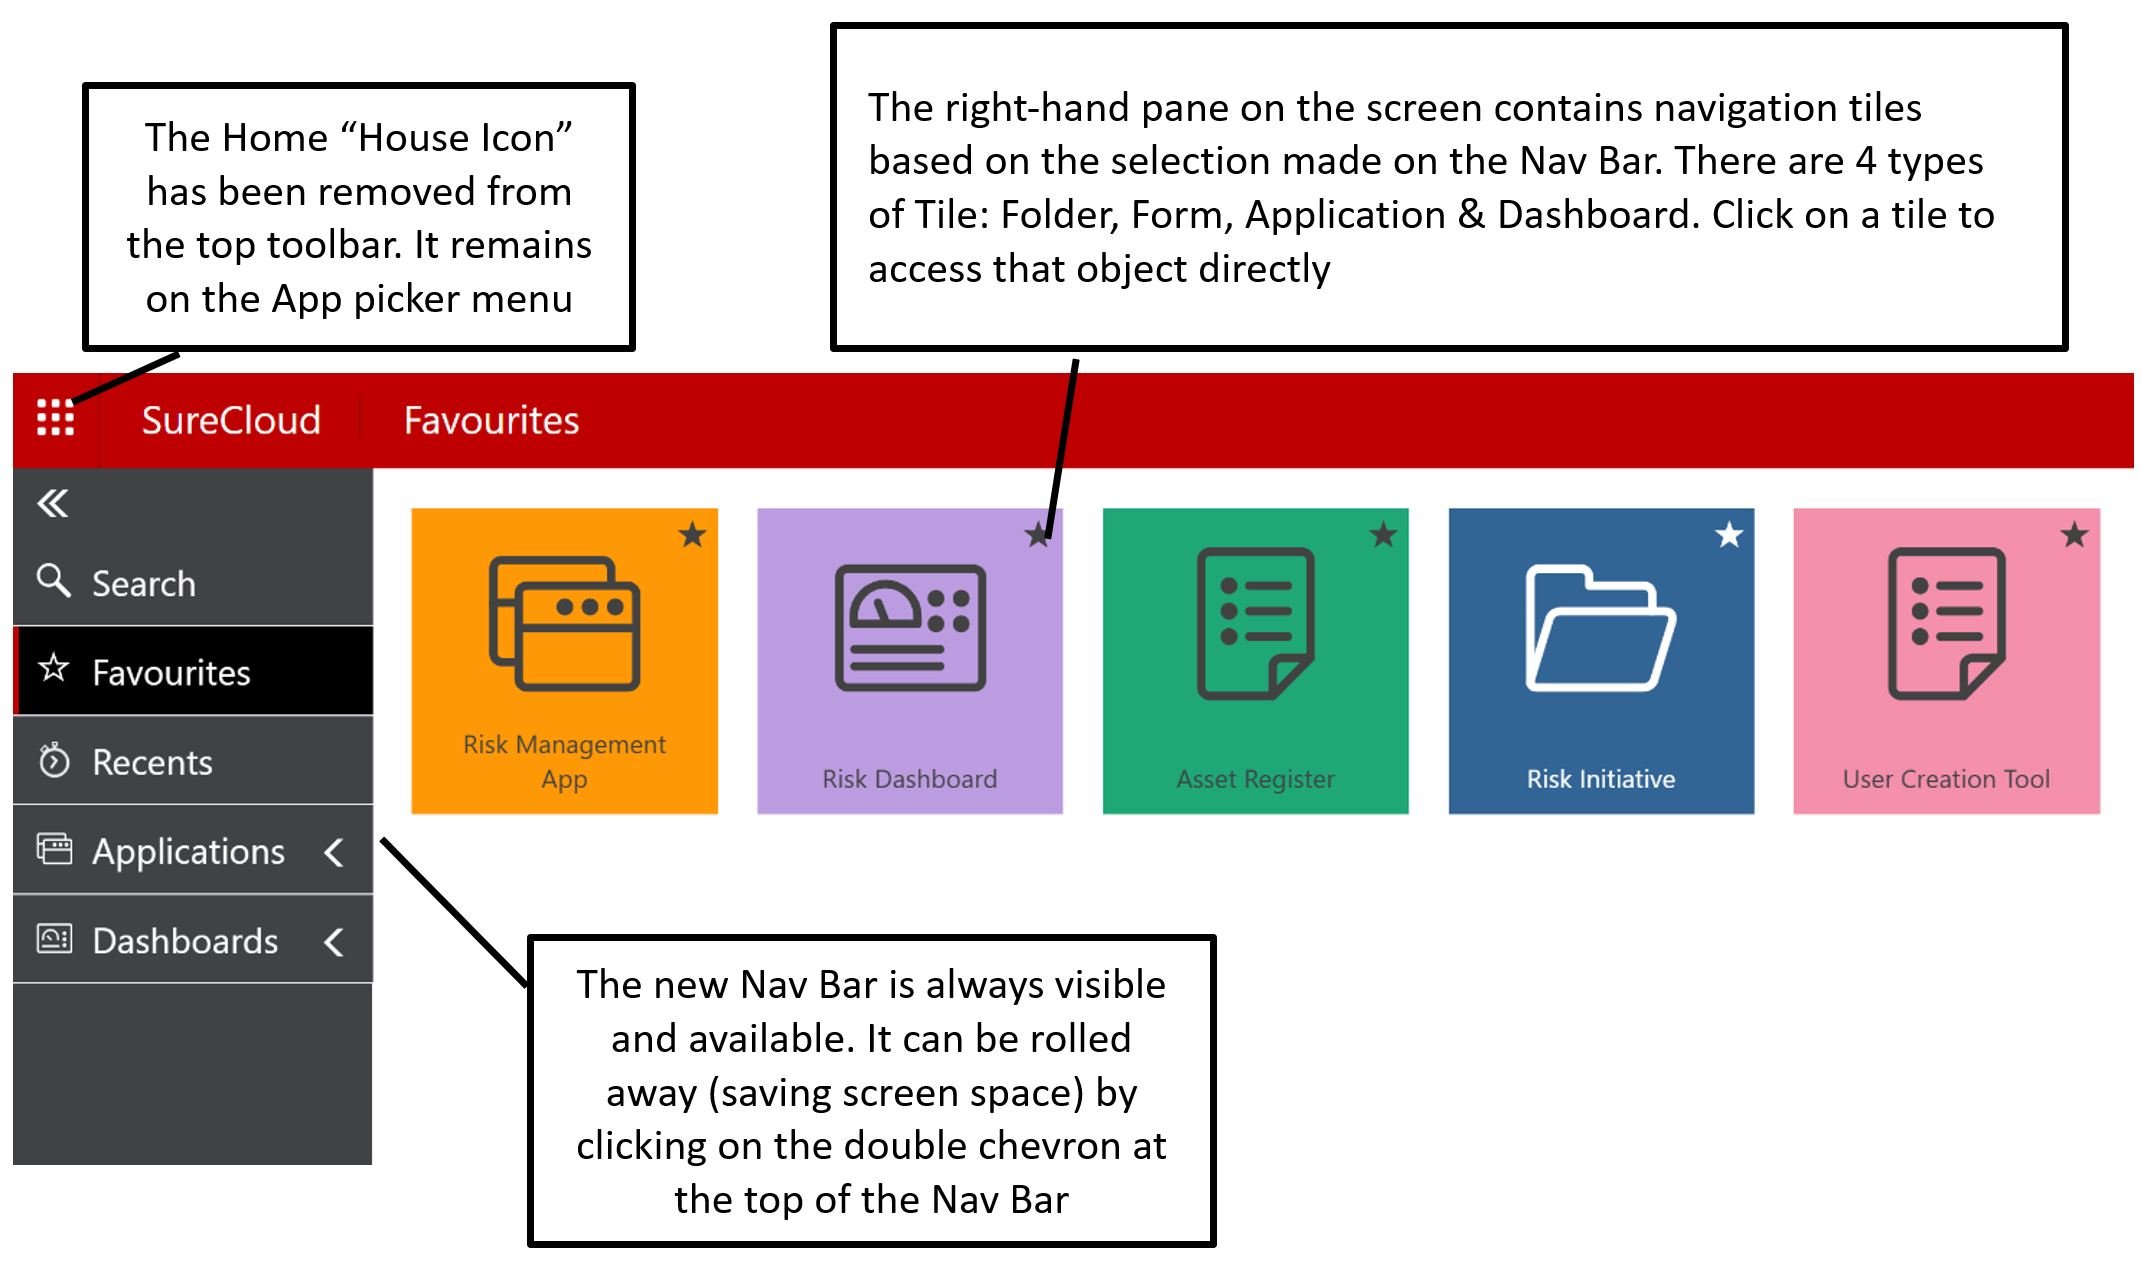
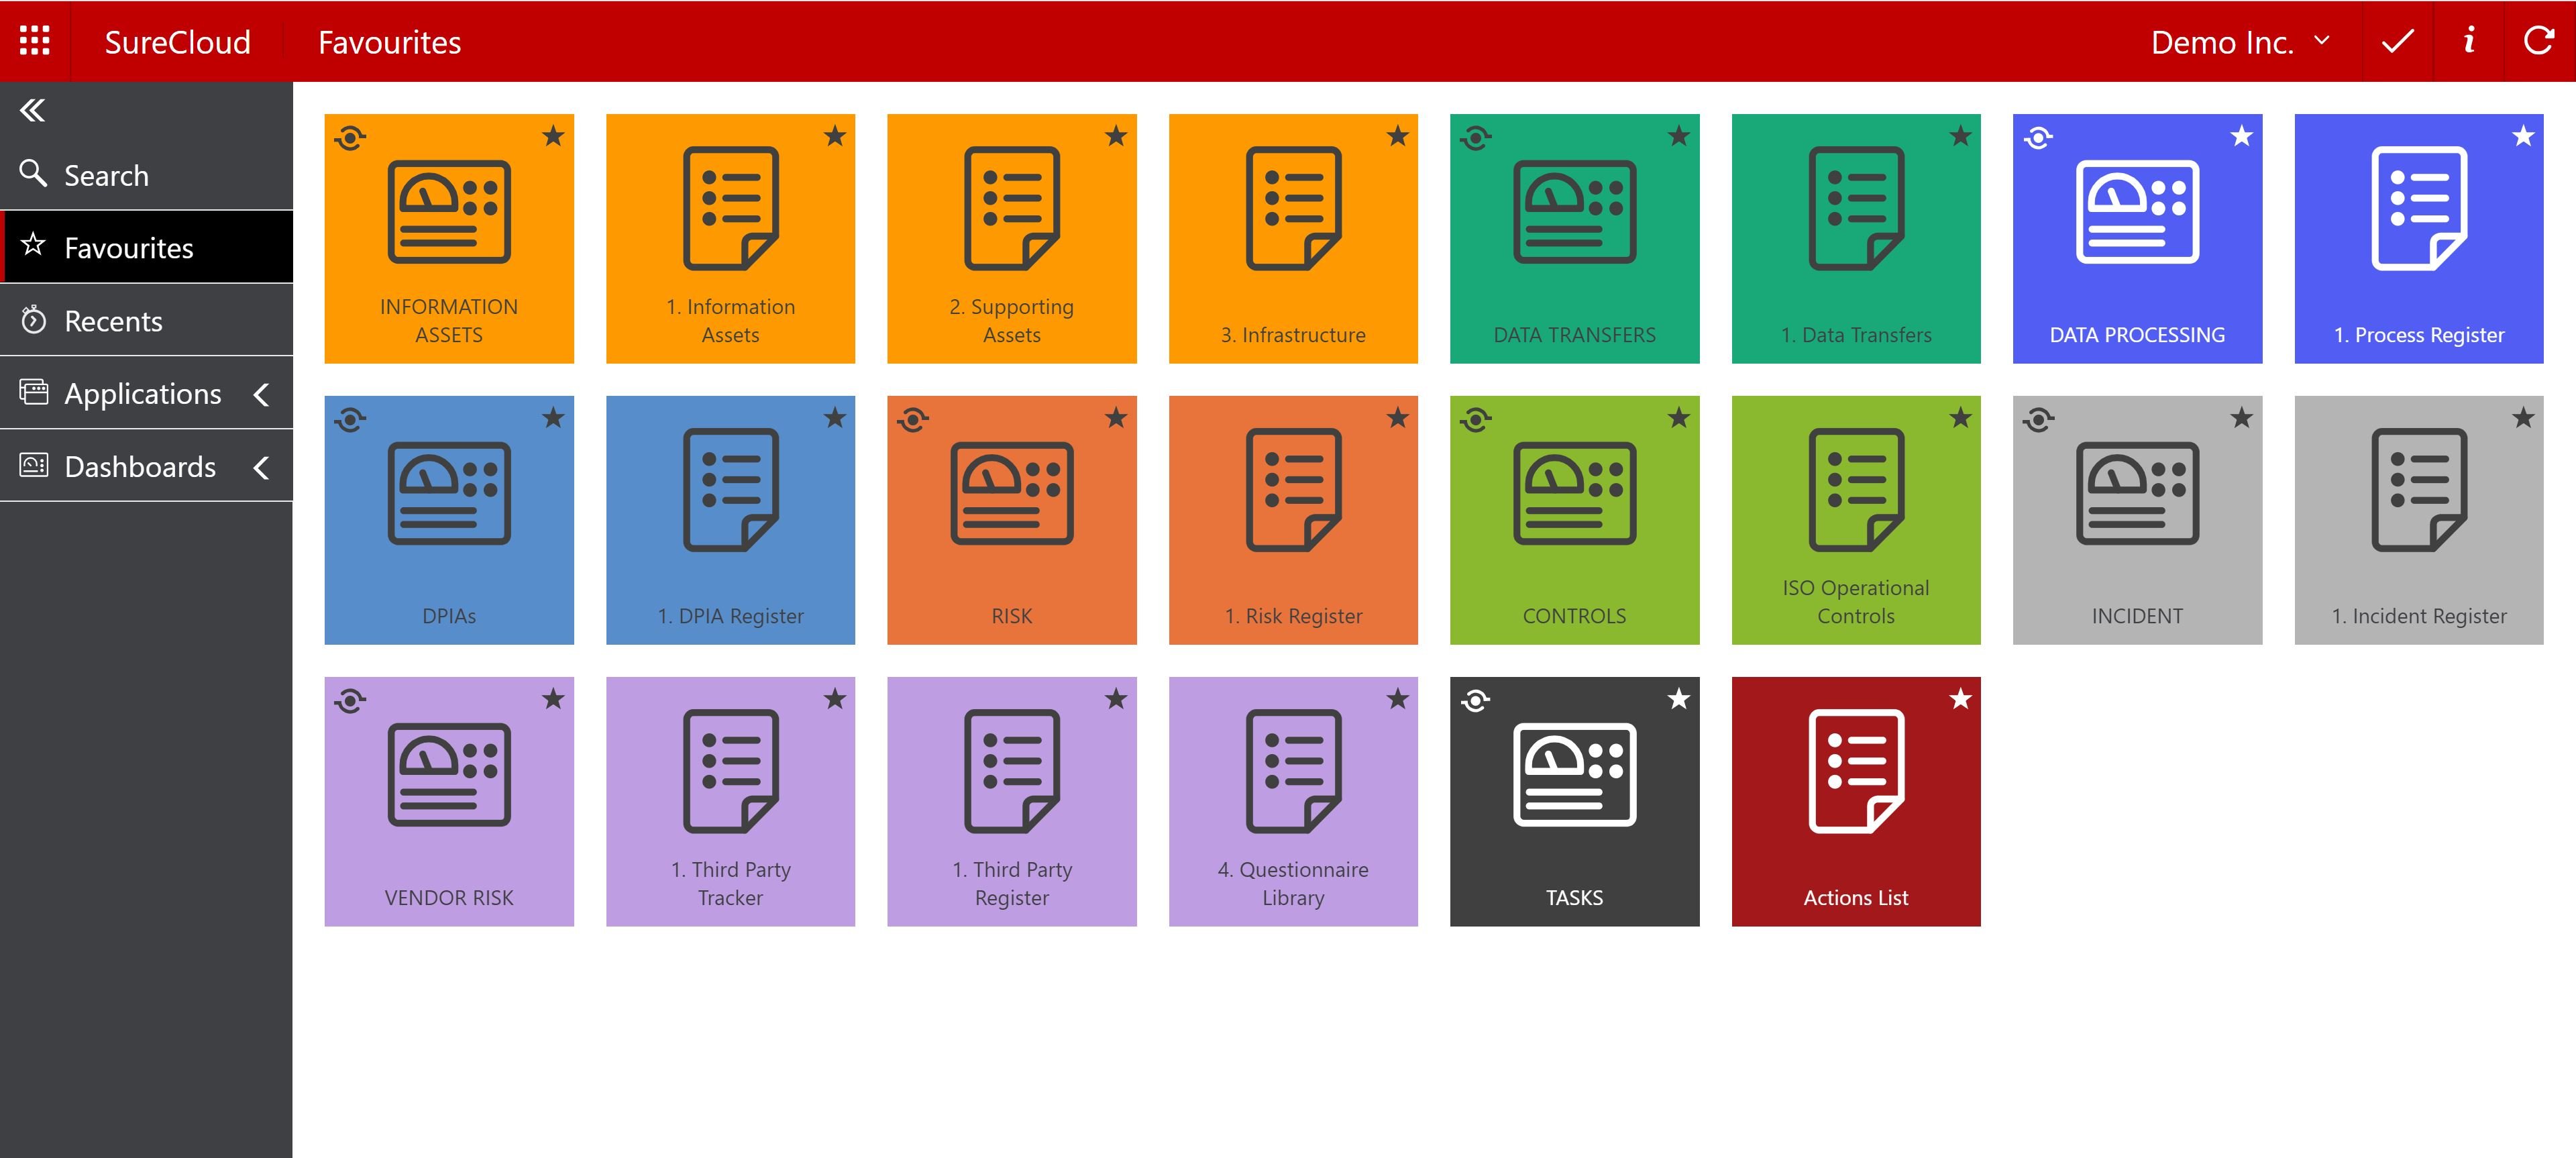
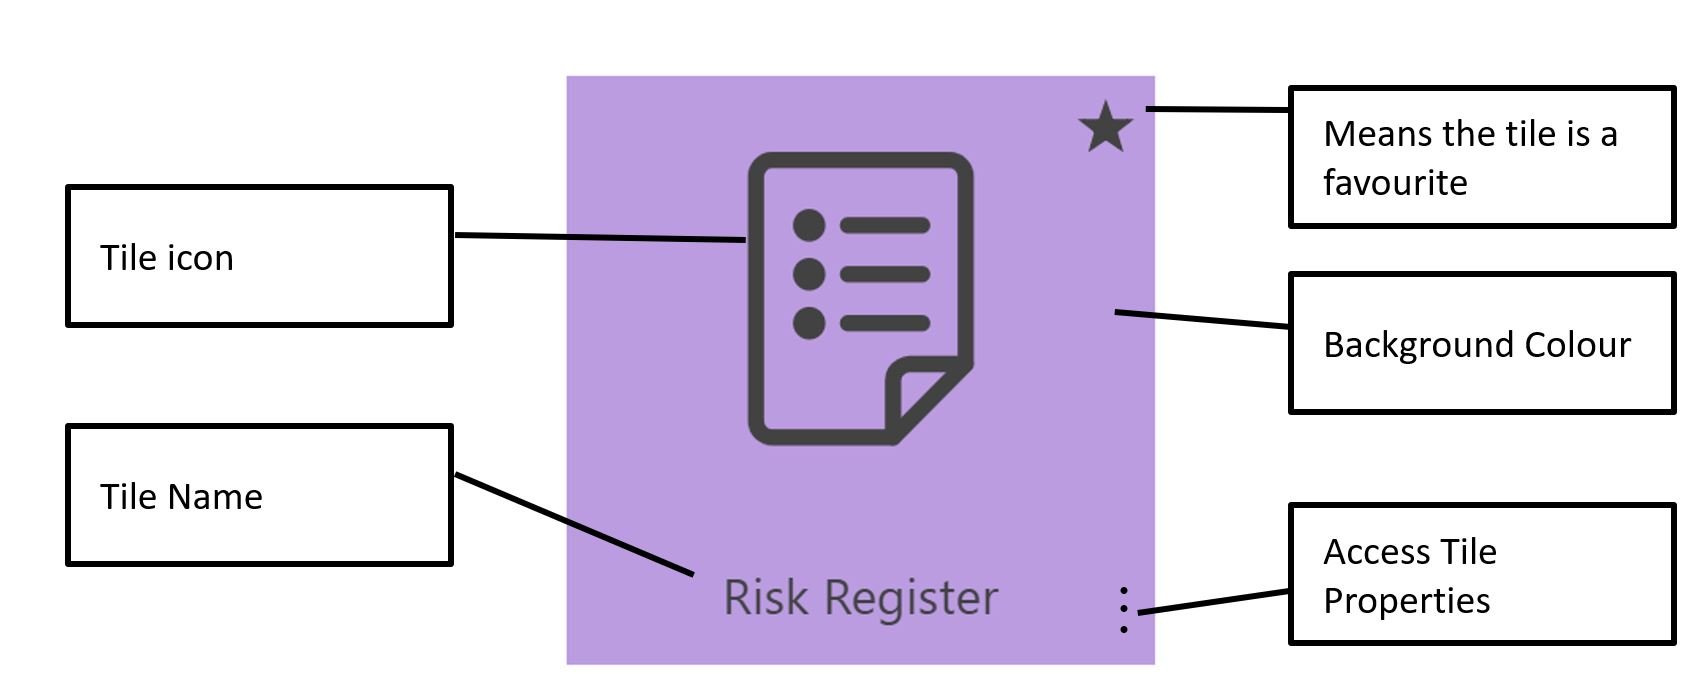
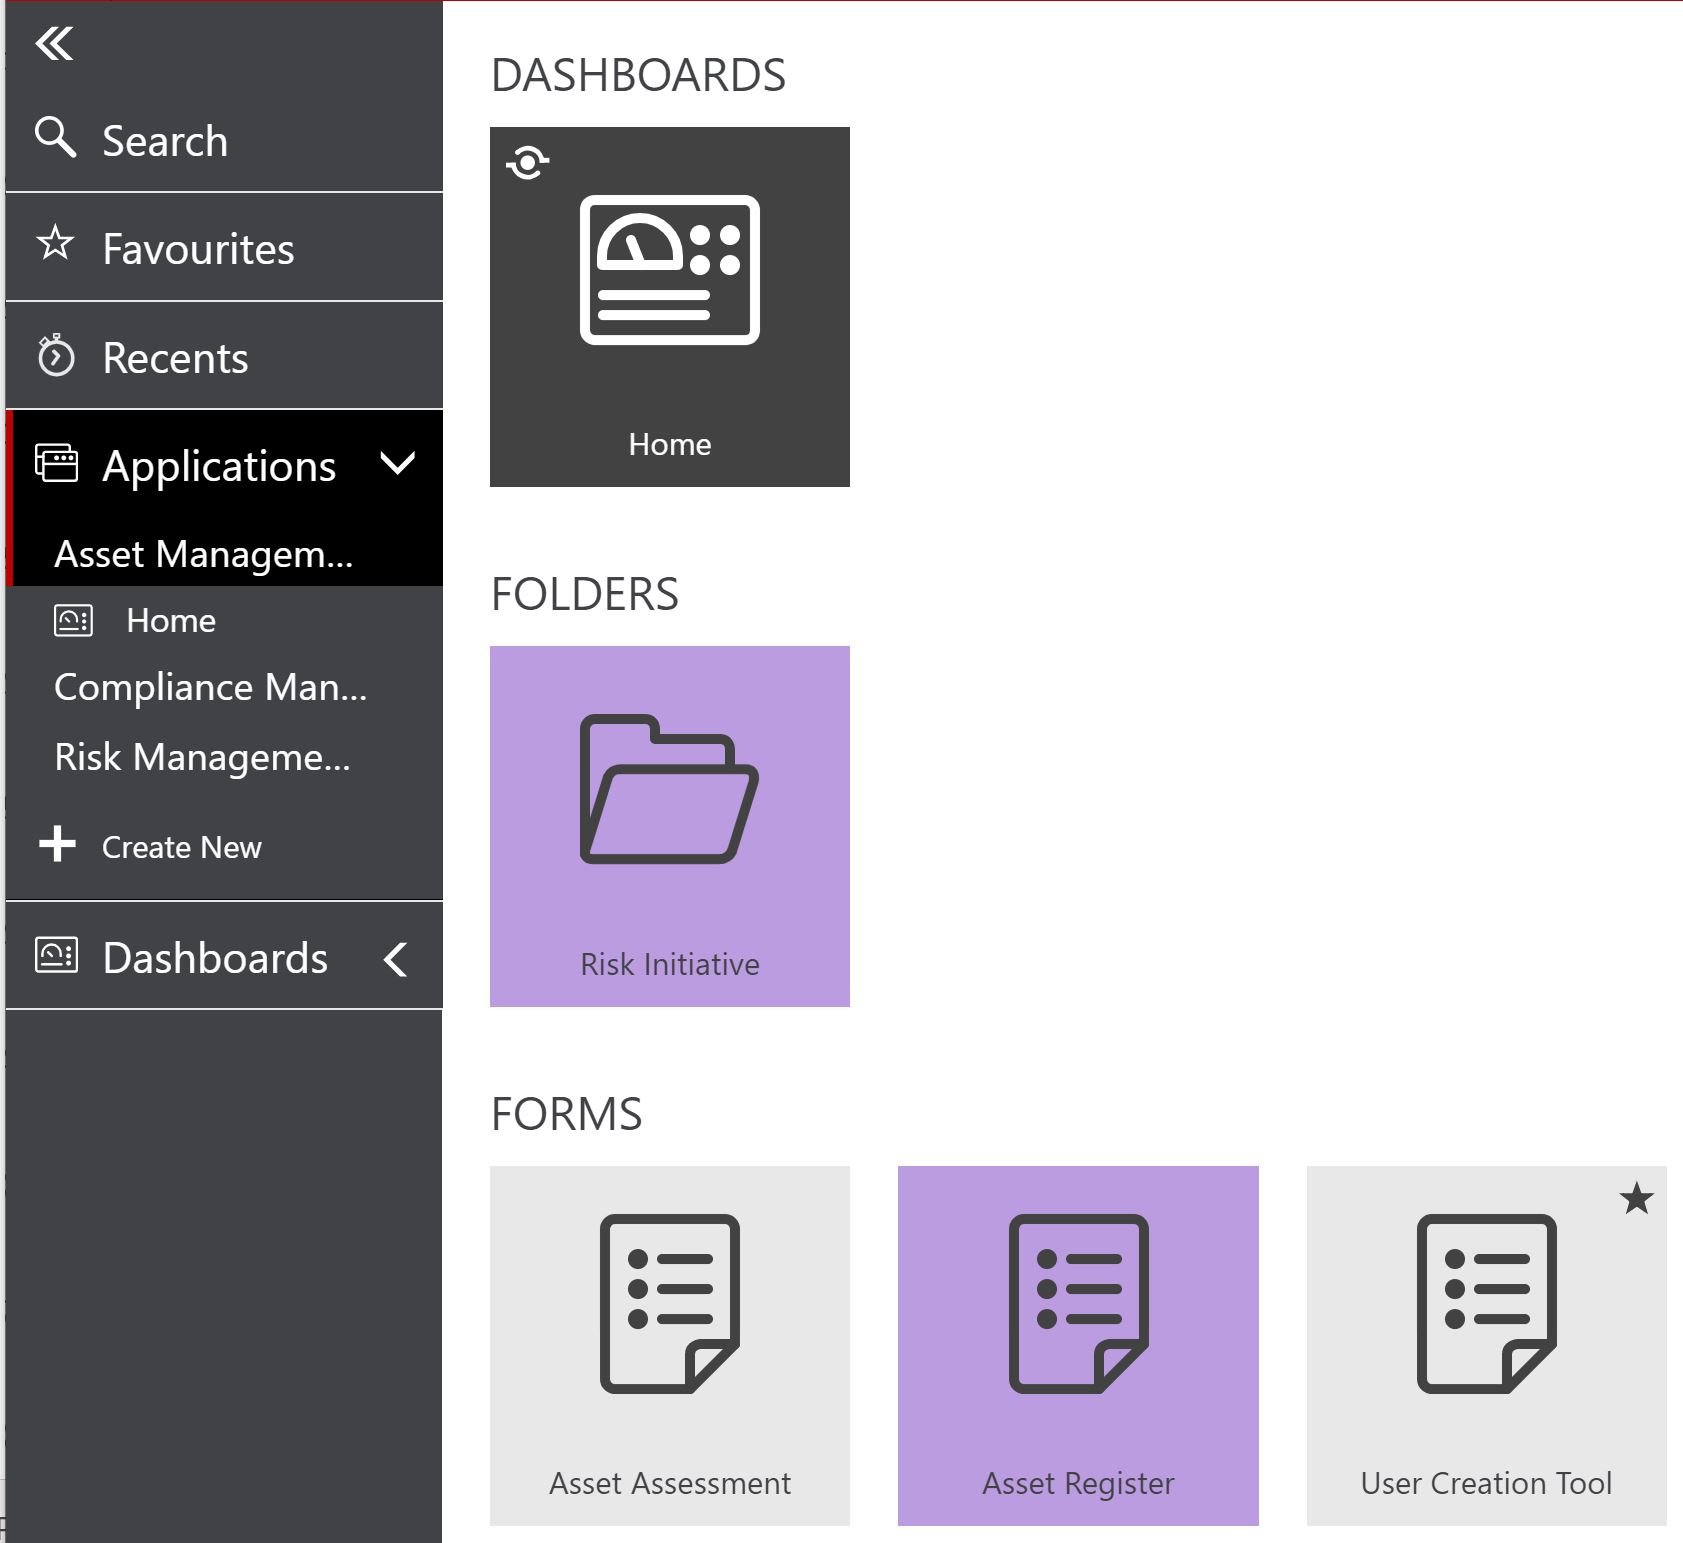
Tiles
A tile represents an object in SureCloud; Form, Folder, Dashboard or Application. The name that appears on a tile is directly derived from the object it represents. For example; a Dashboard called “GDPR Dashboard” will have that same name on its tile. If the Dashboard is renamed, then the associated tile will also be renamed to match. The same holds true for Forms and Folders.
The background colour of all tiles can be modified by editing the Tile Properties. The foreground colour of the tile (icon and wording) is automatically chosen to offset the background colour. The user will require Full Control permissions to edit the colour of tile. Once set, all users will see the same tile colour.
Using a Tile
All tiles have the following attributes:
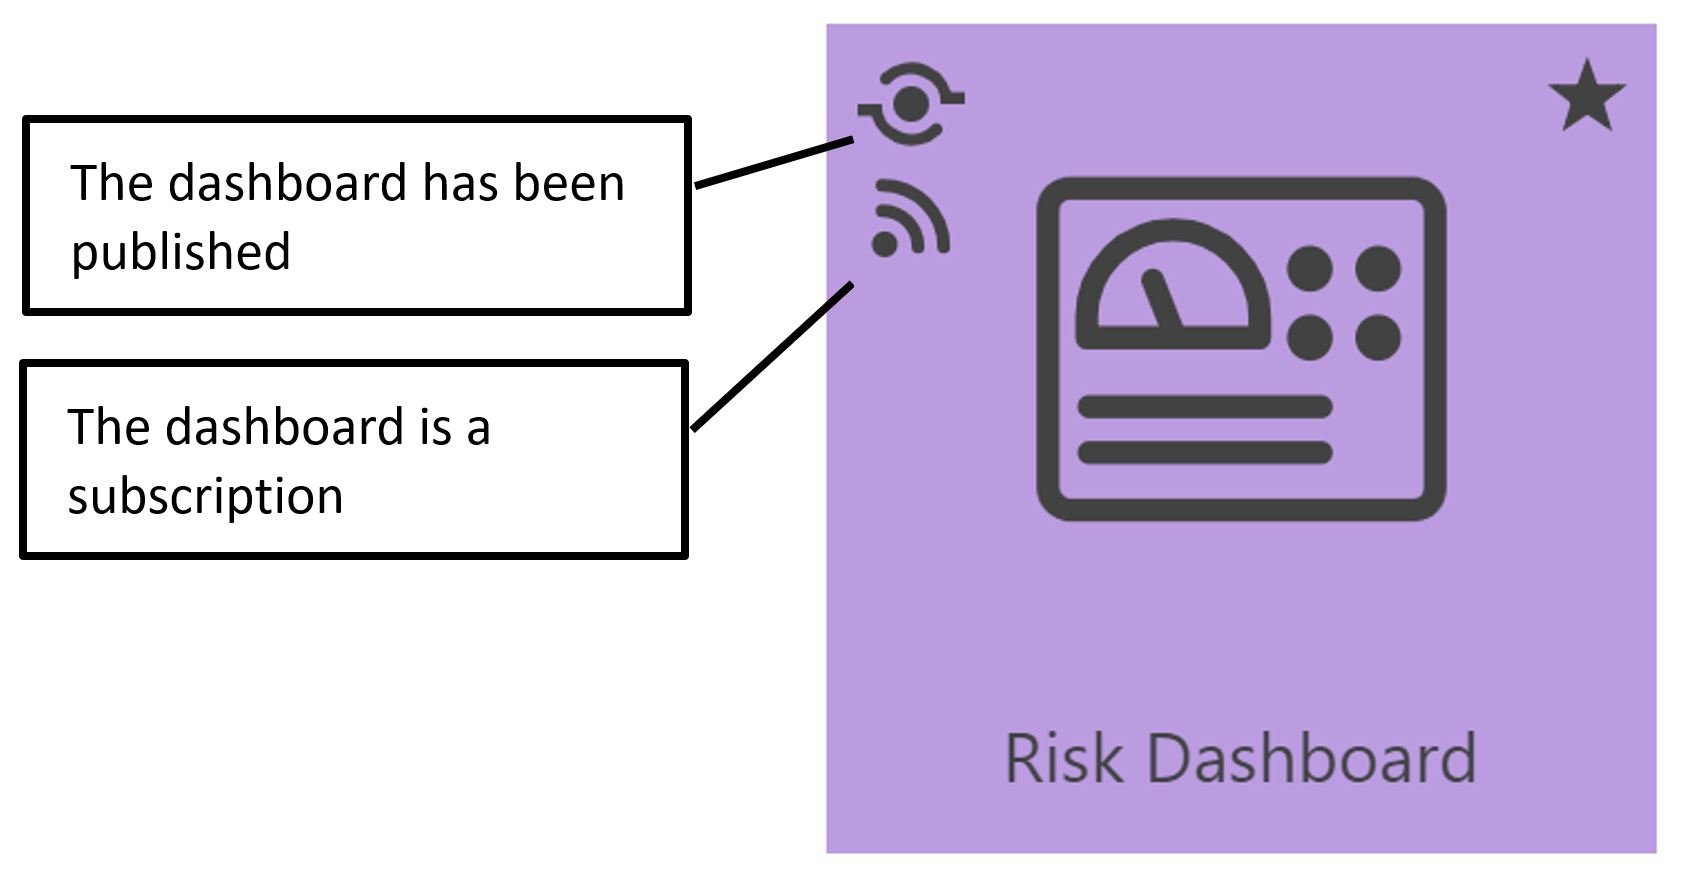
Dashboard tiles also have the following attributes:
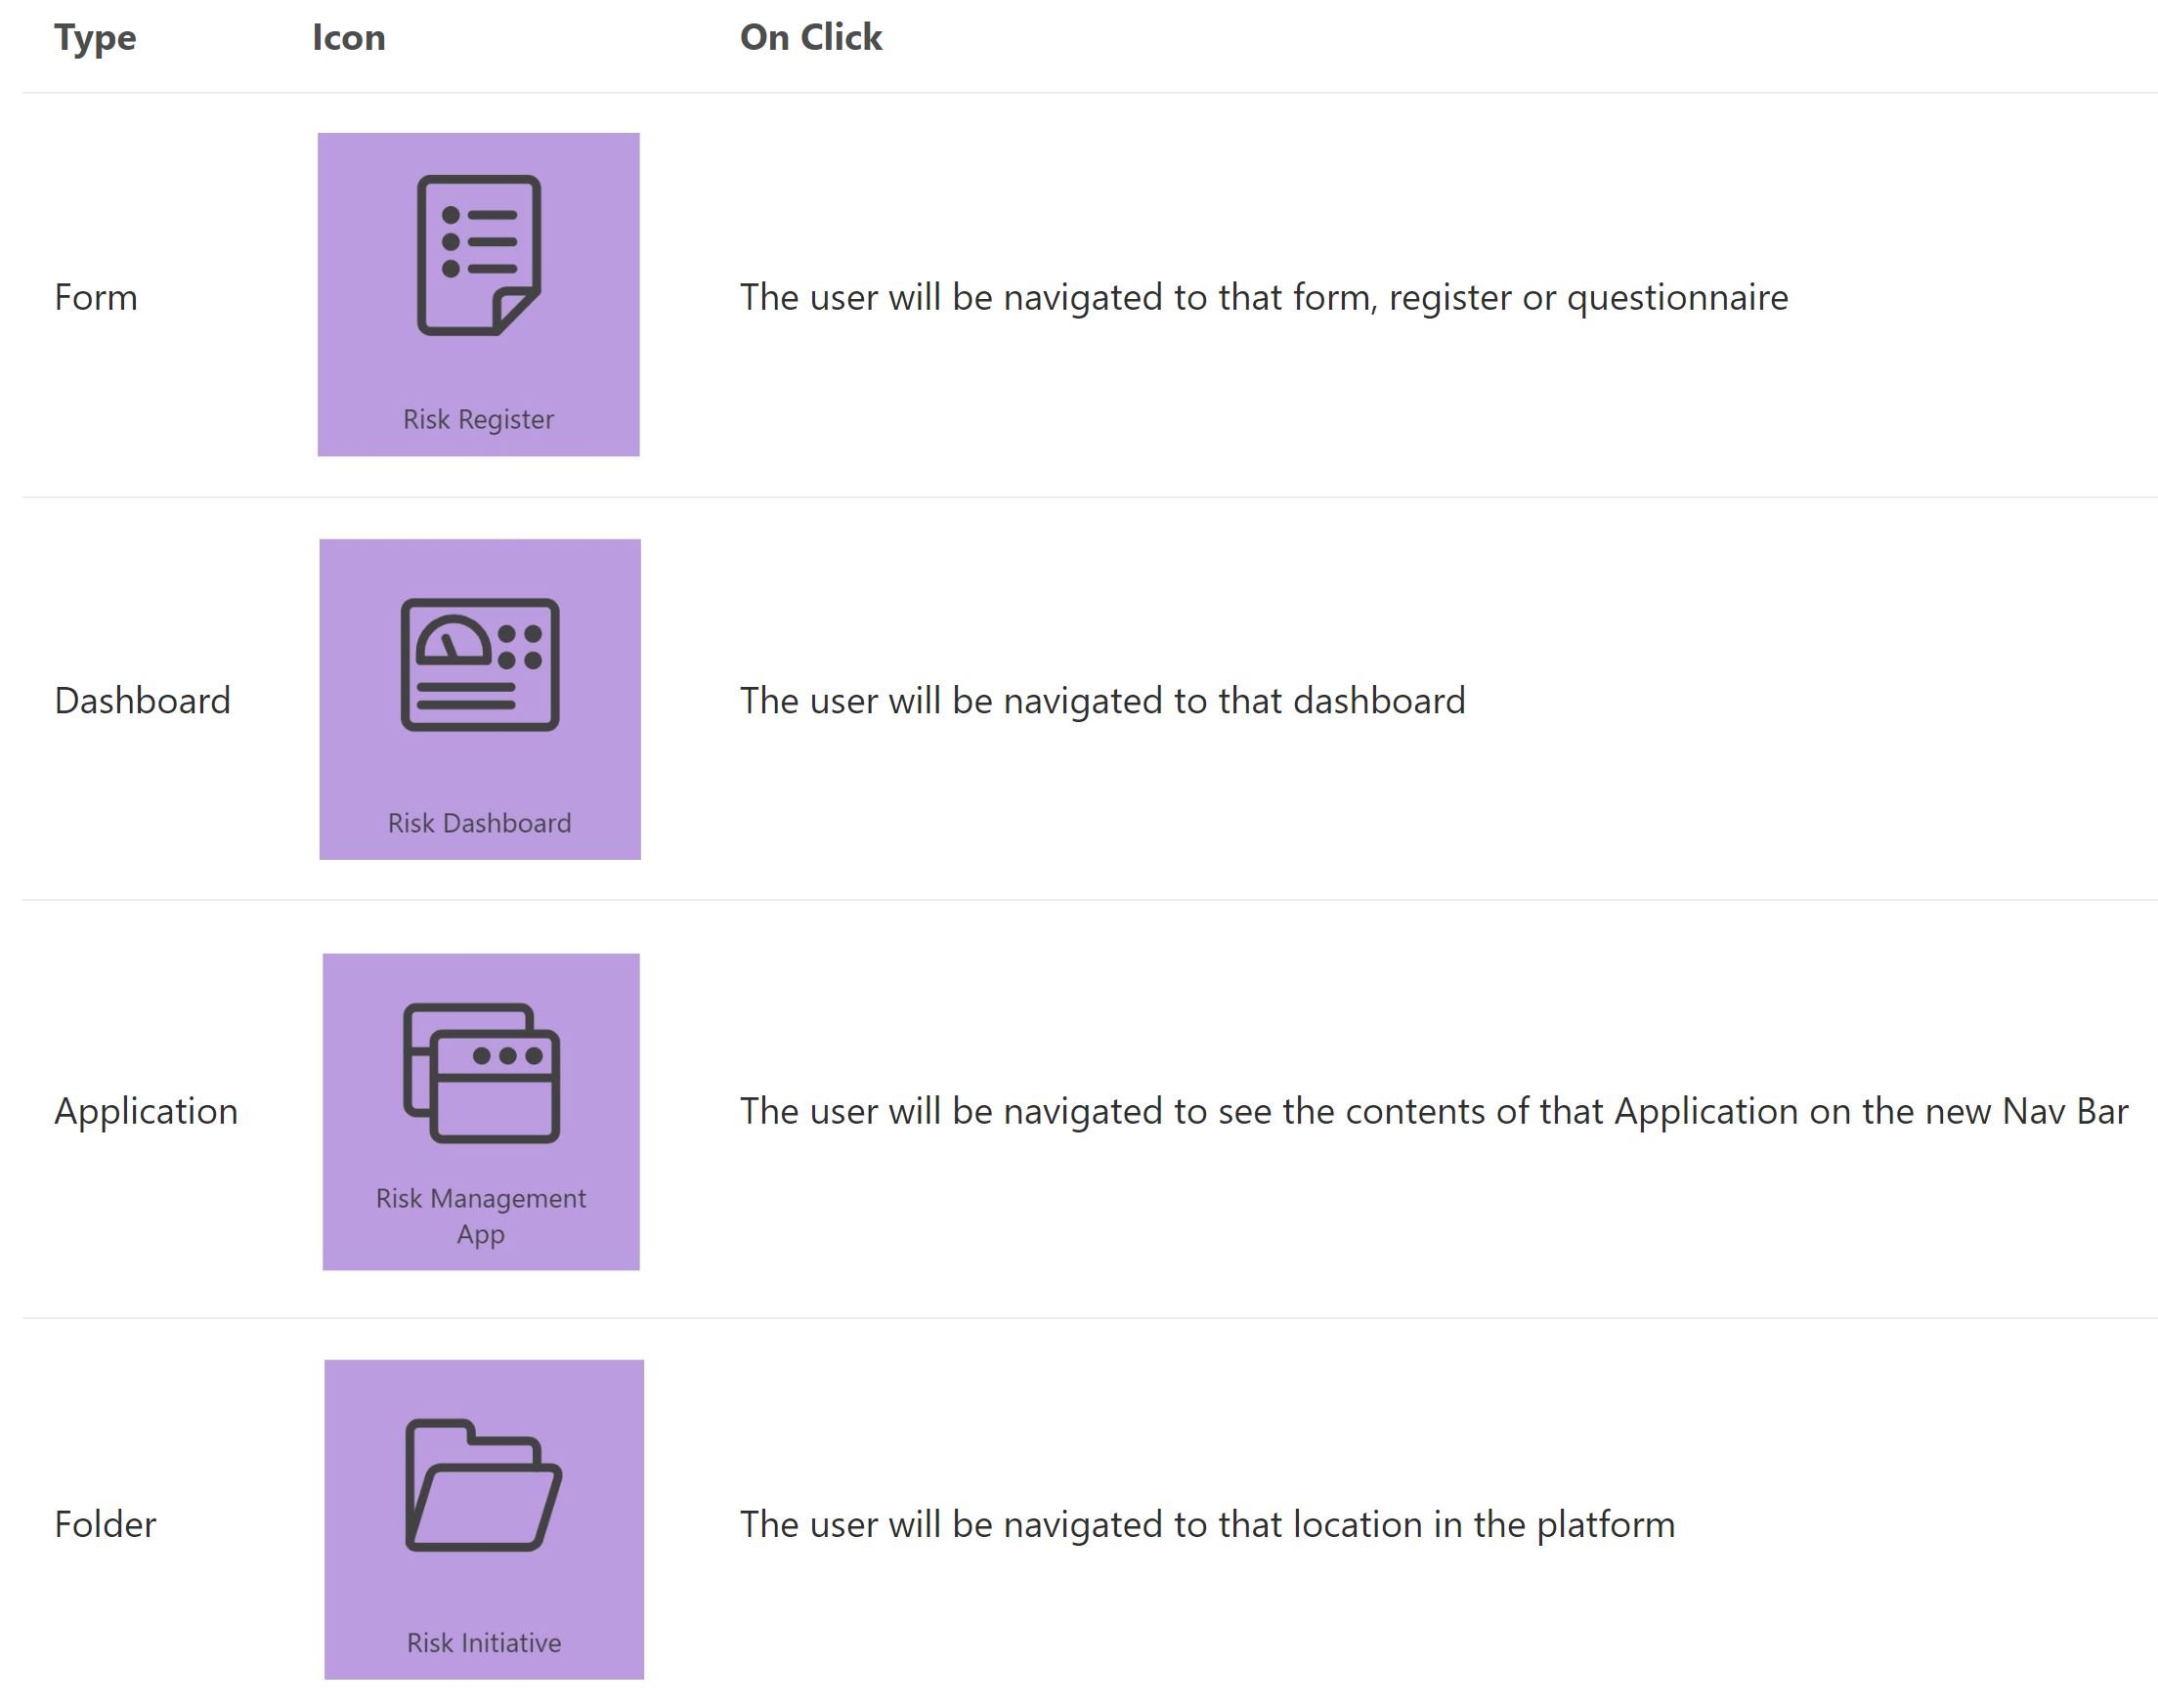
The 4 tile types
Editing a Tile
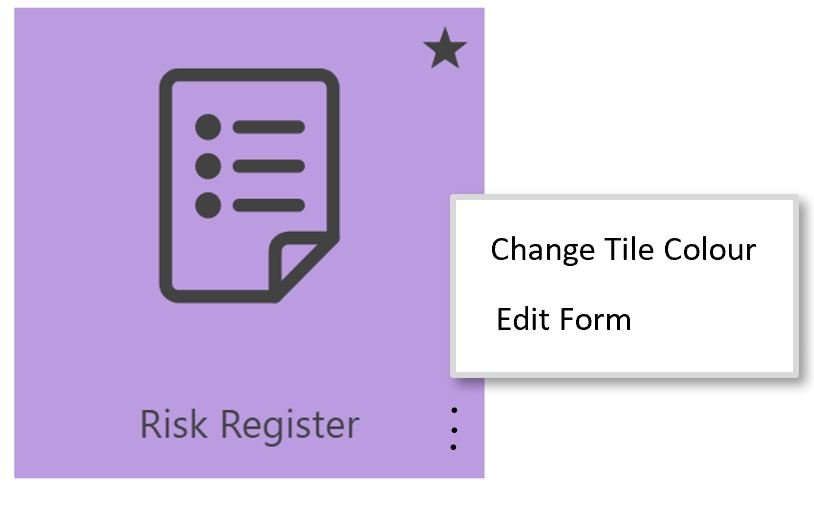
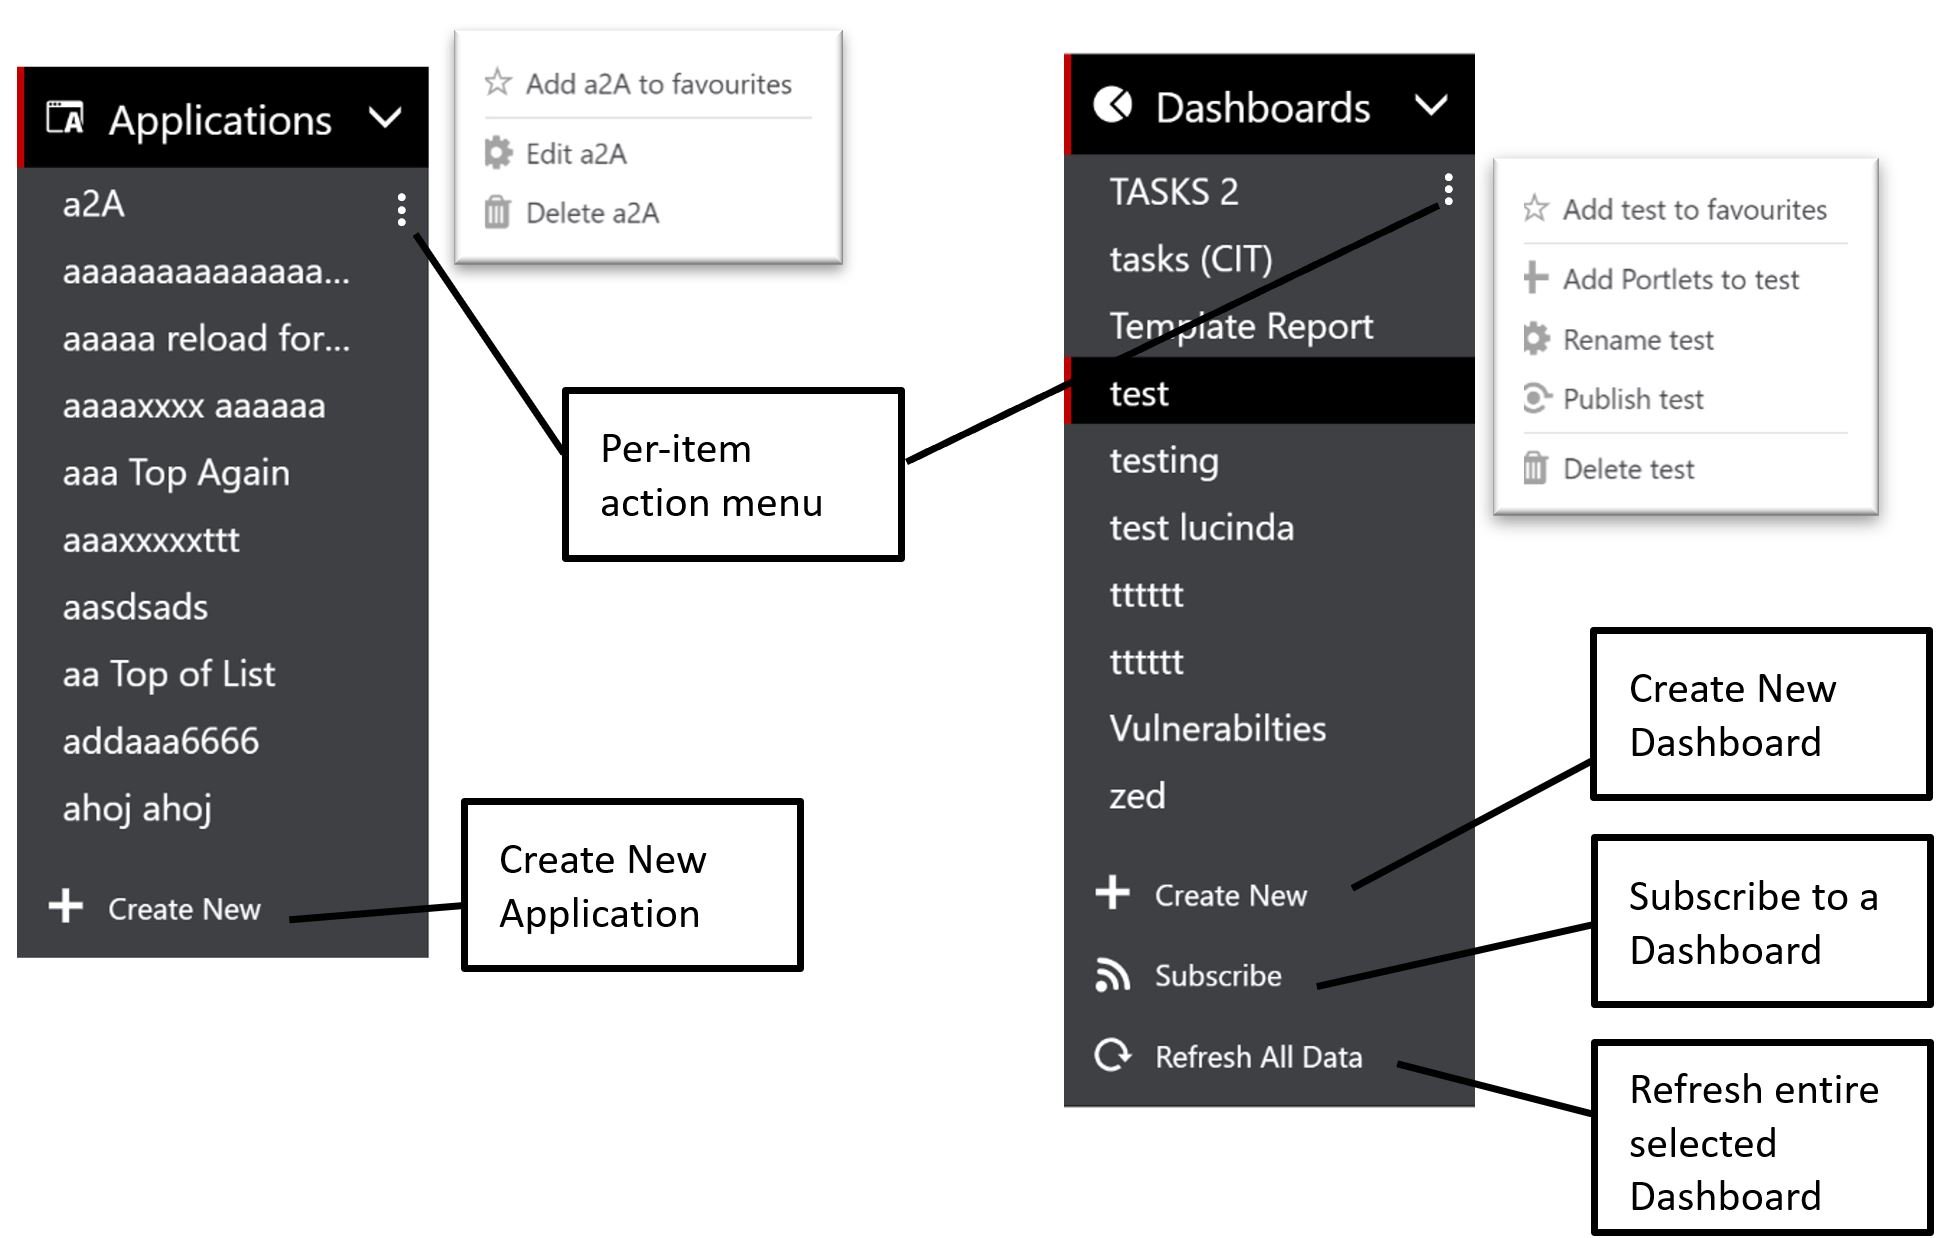
All tiles have a menu that can be invoked by hovering over the tile and then selecting the ellipses icon (3 dots). If the ellipses do not appear when you hover over a tile then it indicates you do not have the required permissions to make changes to it:
Nav Bar
The new Nav Bar is used to find Tiles of different types:
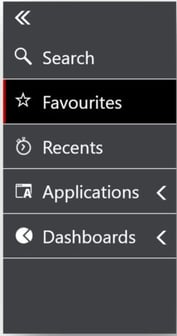
There are 5 high level groupings:
Nav Bar Group |
On Click |
Search |
Allows the user to begin typing a search term. Search results will be displayed in the right-hand pane. |
Favourites |
Displays the user’s favourite tiles in the right-hand pane. A tile can be made a favourite by selecting the star icon at the top right of any tile. The star will now become permanently displayed on that tile signifying it is a favourite tile. A tile can be un-favourited in a similar manner by clicking the star icon again. The tiles can be rearranged using drag/drop. |
Recents |
Displays the last 30 locations that the user has visited in the right-hand pane; forms, folders, dashboards or applications. The tiles are listed in chronological order; most to least recent, and cannot be rearranged or sorted. |
Applications |
Displays the list of Applications that the user has access to in the right-hand pane.It is possible to view an Application by clicking on a tile (in the right-hand pane) or by clicking a name on the Nav bar sub-menu.An Application comprises a series of forms, folders and dashboards. The tiles are listed in alphabetic order and cannot be rearranged or sorted. |
Dashboards |
Displays the list of Dashboards that the user has published or subscribed to.It is possible to view a dashboard by clicking on a tile (in the right-hand pane) or by clicking the name on the Nav bar sub-menu.The tiles are listed in alphabetic order and cannot be rearranged or sorted. |
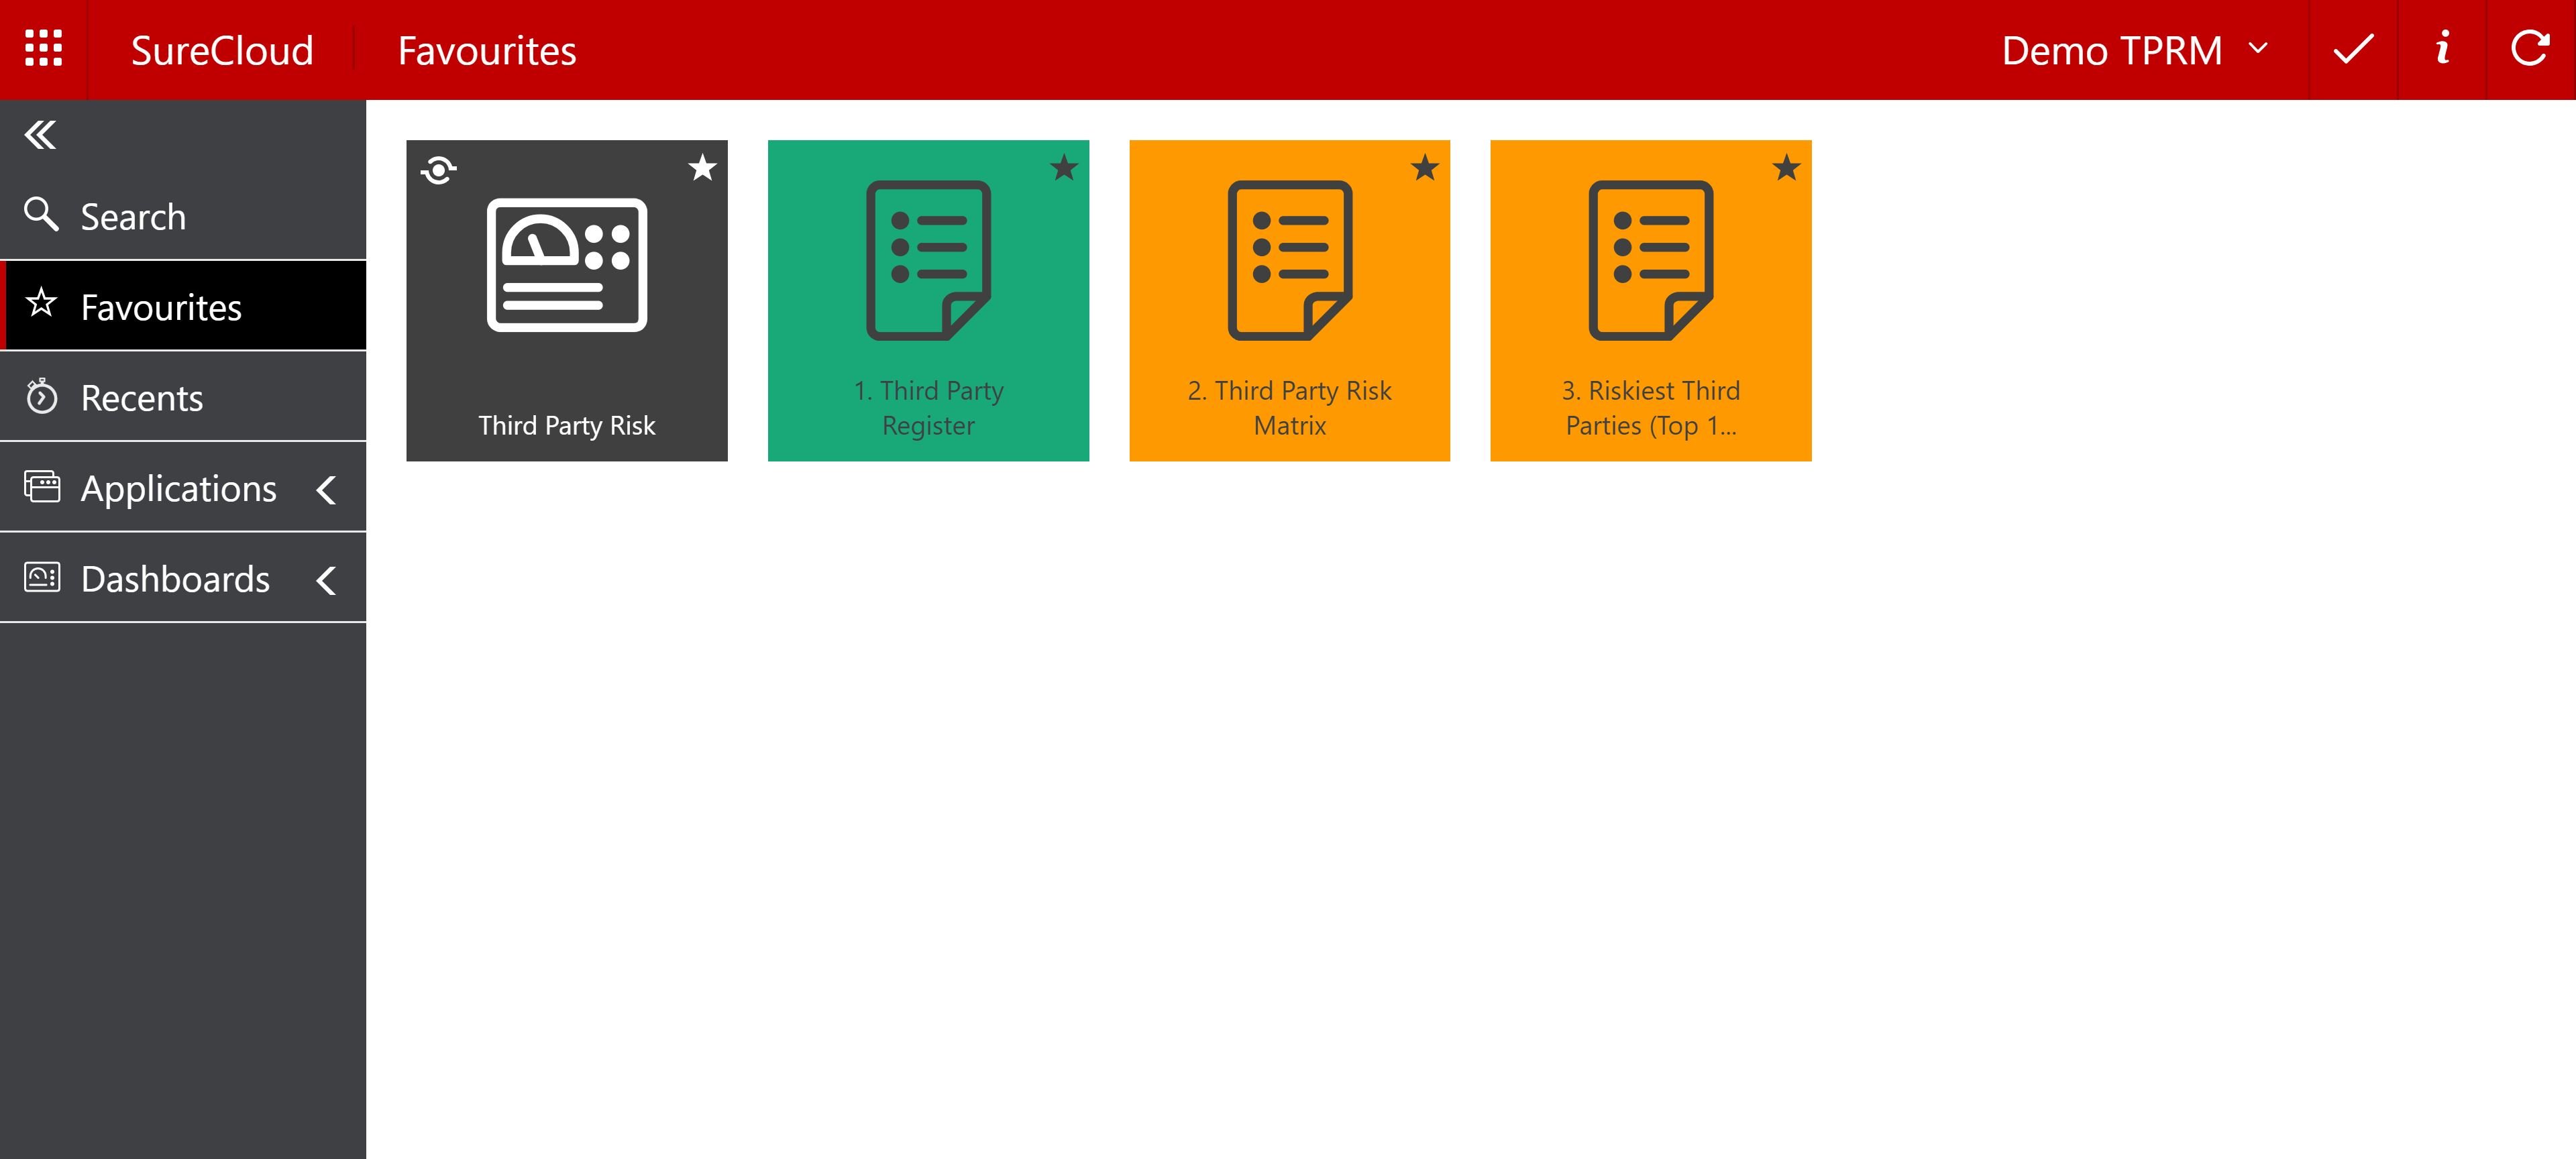
Favourites
Favourites is where all your favourite tiles will be displayed. You create a favourite by clicking on the star icon on the top right of any tile.
All tiles displayed as favourites can be re-arranged on the screen to suit your preference via drag and drop. This the only place where drag and drop organising is allowed.
If you see a tile that you do not want in your Favourites, then simply click on the star icon, once again, to signify this is not a favourite.
Nav Bar Actions
It is possible to take actions against Dashboards or Applications directly from the Nav Bar by invoking the ellipses (3 dots) menu from the relevant object:
Applications
The new Tiles UI introduces the concept of an “Application” entity – visible on the Nav Bar.
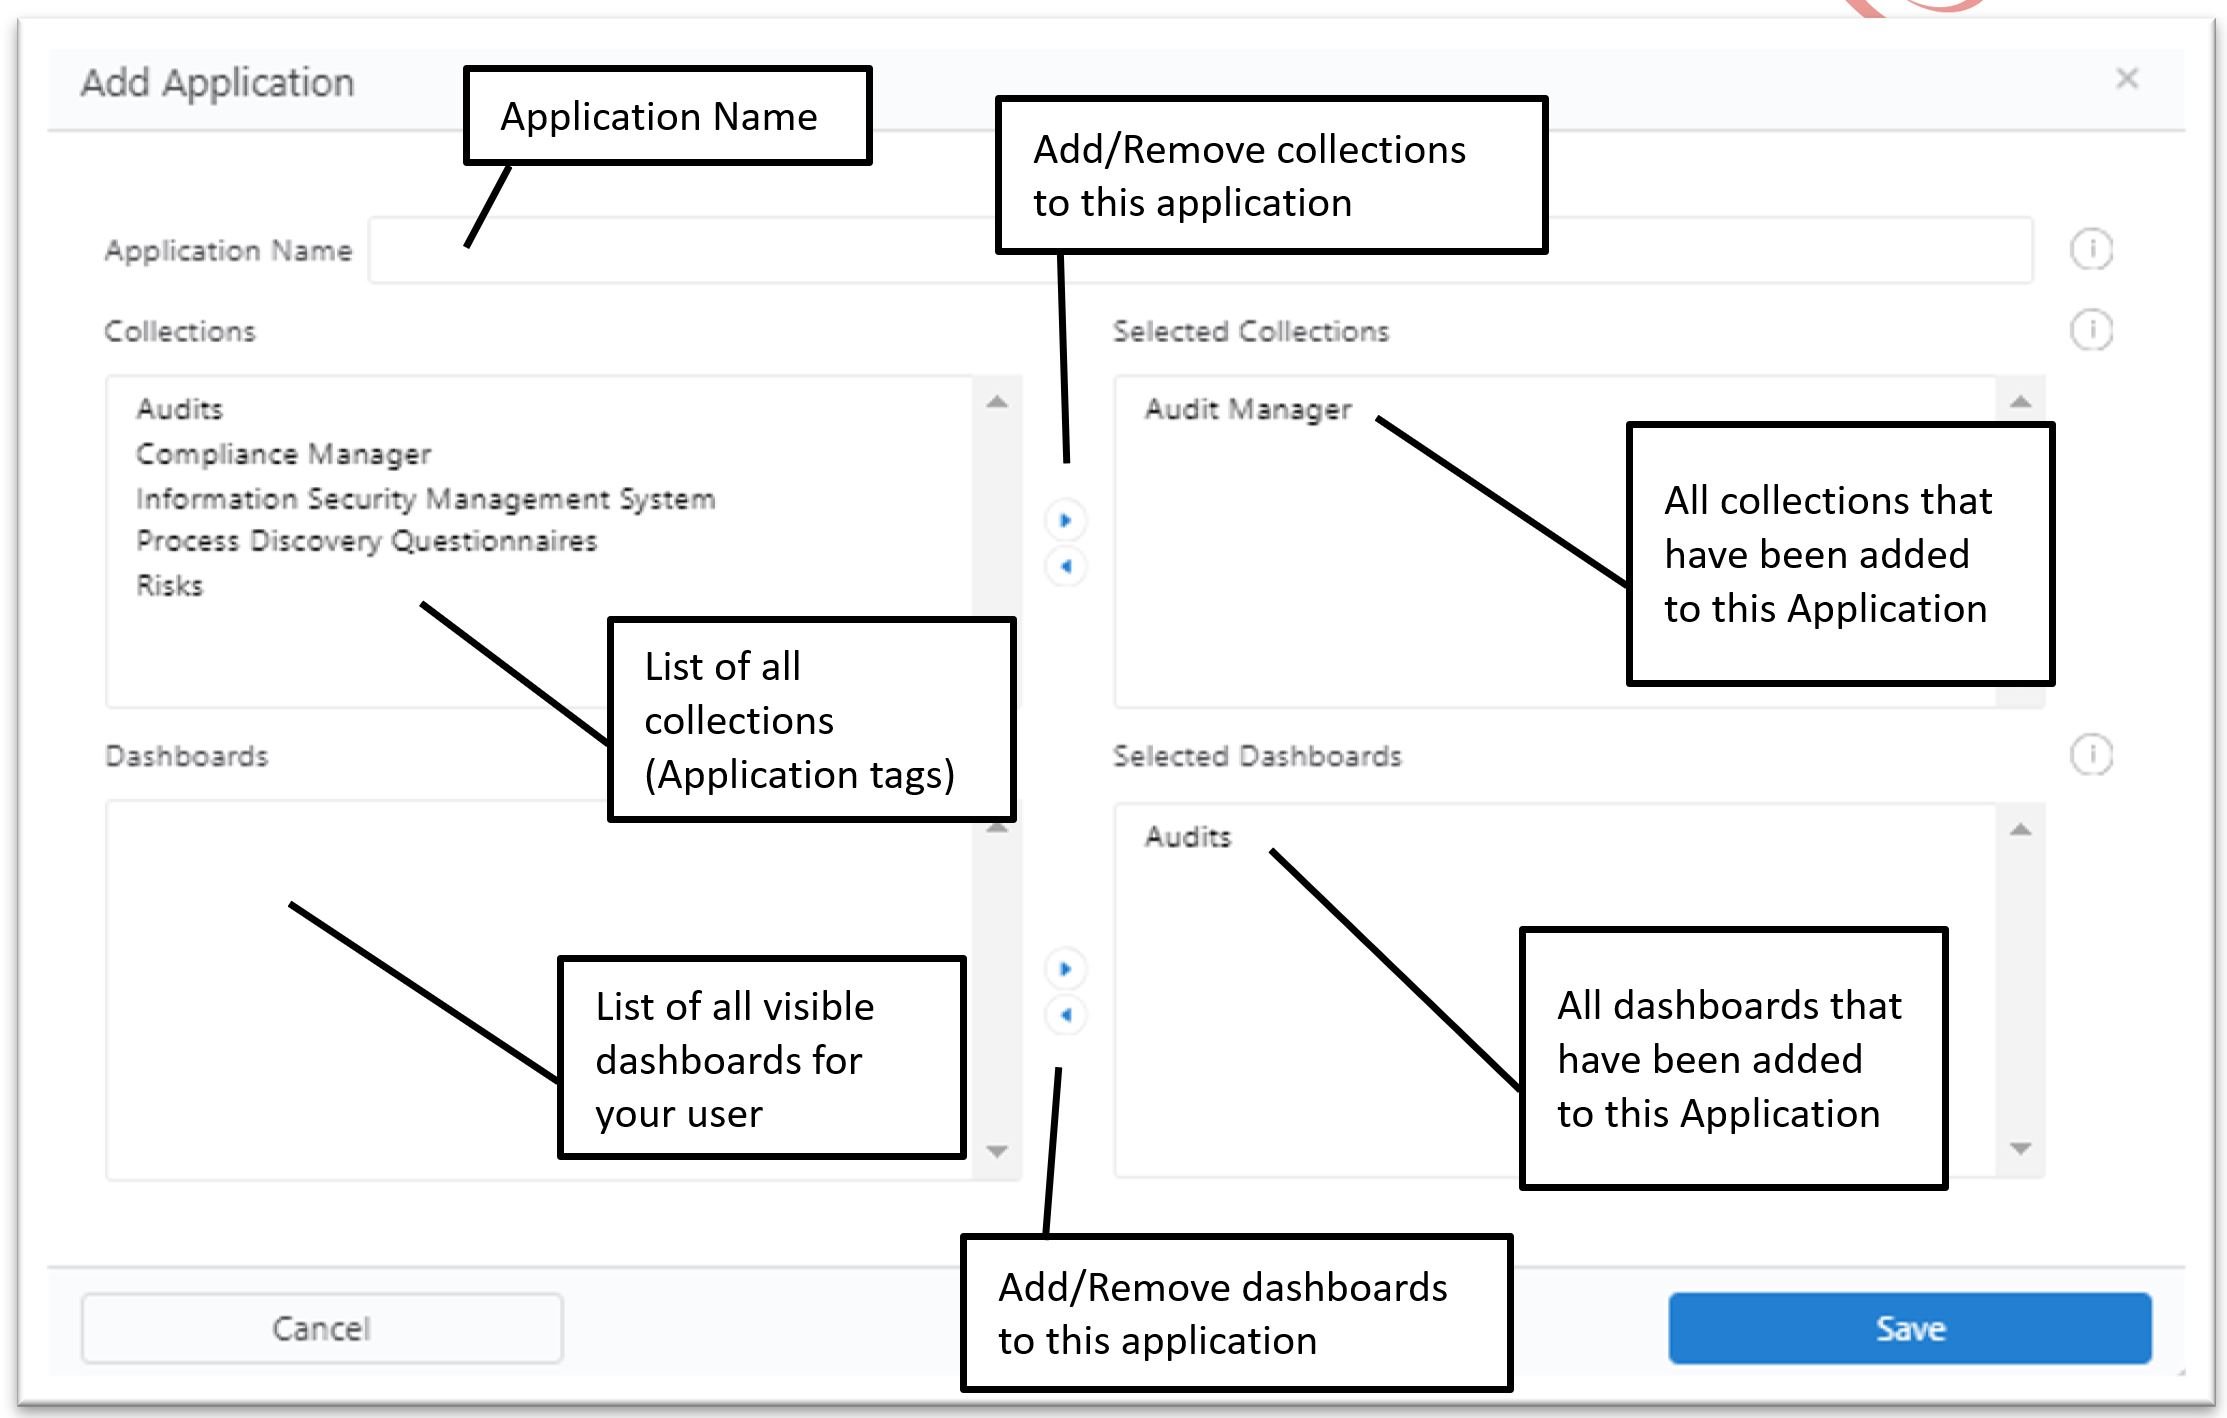
An Application is a logical grouping of forms and dashboards that comprise any given SureCloud Application. For example, you might define an “Application” for Information Asset Management or Compliance Management or whatever you’ve decided to call your particular SureCloud application.
When you create or modify an Application, you’ll be able to choose the forms that belong to that Application by selecting one or more Collections. A collection is another term for the Application tag setting that you define on every template/form.
Once created, Applications are visible to any user, in your organisation, who has access to at least one form contained within.
Application creation and configuration:
Create
To create a new application select the “New Application” option under the Application category on the Nav Bar.
Give the application a name and then provide collections and dashboards that belong in that application. Use the left and right arrows on both Collections and Dashboards to move relevant items to the right hand side (which indicates they are now part of this application).
Edit
To edit an application select the ellipses (3 dots) menu against the application you wish to edit and select “Edit Application”
The Create and Edit application configuration screen is exactly the same:
Example: An Application called “Asset Management”:
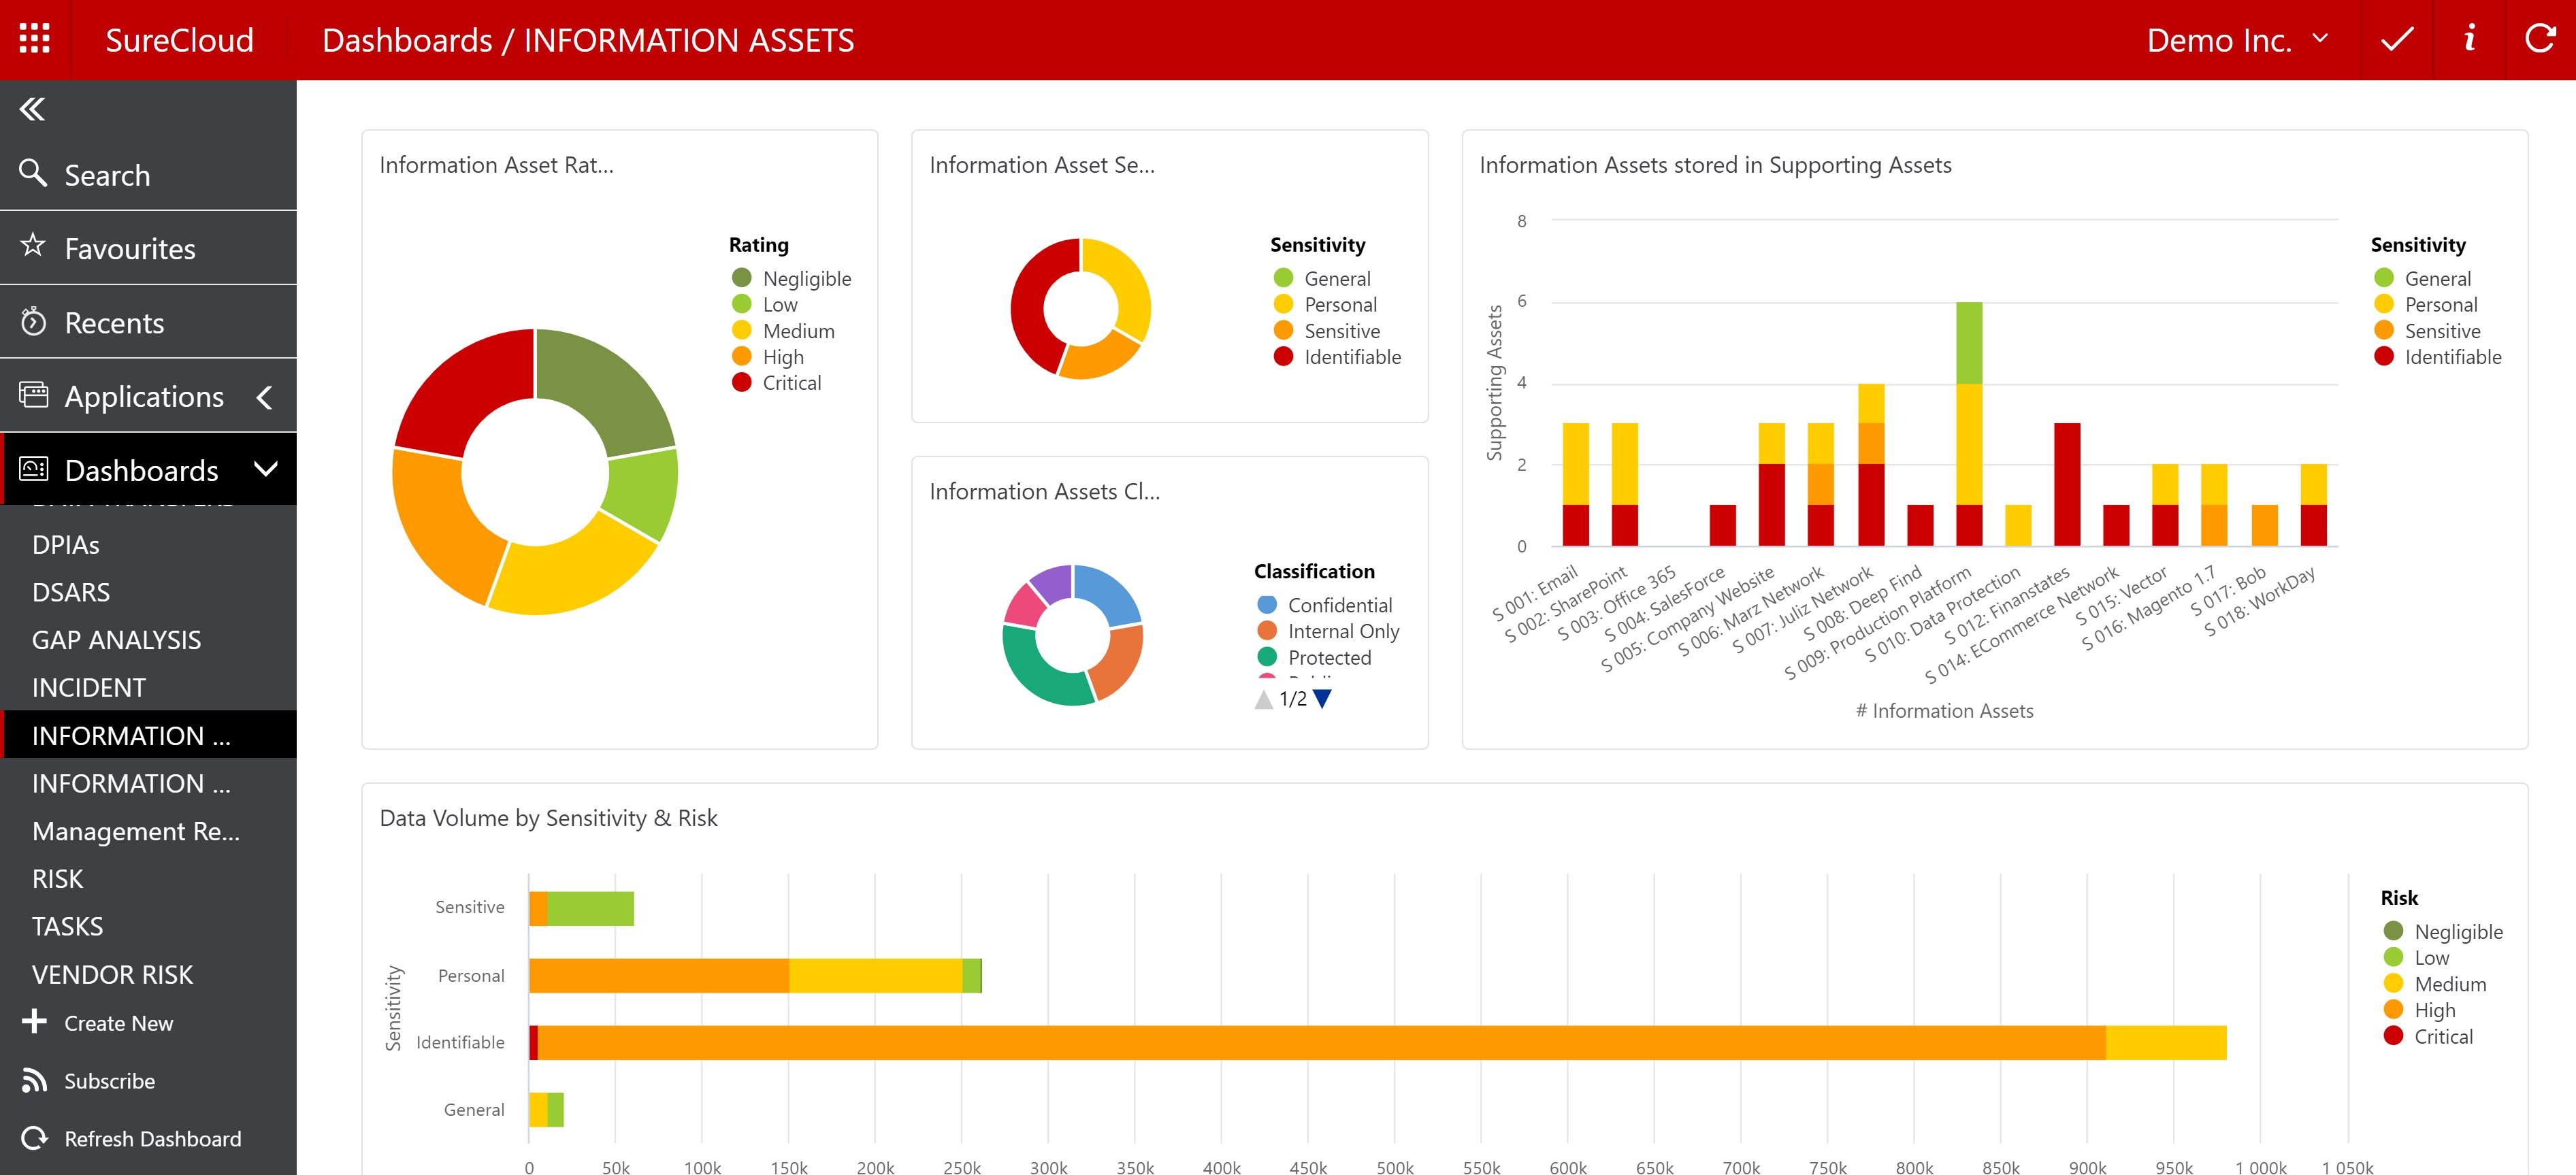
Dashboards
Dashboards have been revisited to address many of the issues prevalent with the current dashboards. Modern dashboards operate in a very similar and familiar fashion as previously:
- Portlets can be added, removed and then configured from within a dashboard.
- Portlet configuration options are available via the ellipses (three dots) menu at the top right of each Portlet and can be freely moved around the Dashboard canvas and resized at will (no more columns or fixed sizes)
- There are two new portlet types:
- Free Text; Allows a user to display user defined, free text alongside simple markup such as bullets, numbering and tables.
- Heat Map
- Items will be represented by a bubble
- A list series can be used to define the colour of the bubble
- A value series can be used to define the size of the bubble
- A list of the items and their IDs will be displayed with the heat map
- Items will be represented by a bubble
No more classic dashboards
All home page dashboards (classic or otherwise) will be replaced with the new modern dashboard. All Classic dashboards will be automatically migrated to the new modern style.
Refresh
Dashboards portlets will automatically refresh all data 1 hour after the last refresh.
Viewing Dashboards
Subscribing to dashboards is no longer required in order to view a dashboard. Users will be automatically able to view all dashboards associated with any application they have access to. Users will also retain the ability to view all dashboards they have published.
Subscribing to a dashboard is still possible should the user have a specific dashboard in mind.
Tables and Grids
All grid layout portlets are now displayed using a new grid technology. Tables can be freely modified in real-time:
- Columns can be added, removed, moved and resized
- Any column(s) can pinned (frozen)
- Data can be sorted and filtered (across multiple columns if required)
- Filter and Sorting will now remain in place between sessions and persist after a dashboard refresh.
Access the table options via the hamburger menu available on each column header:
